8 Stunning DIY Cottage Style Garden Decor Ideas to Try
Looking to add charm to your garden? Discover 8 stunning DIY cottage-style decor ideas you can easily make at home. From transforming an old wooden ladder into a plant stand to crafting whimsical lanterns from mason jars, these projects will elevate your outdoor space. Whether you’re a seasoned DIYer or a beginner, I’ll guide you through each step. Let’s bring your garden to life with creative touches that reflect your style!
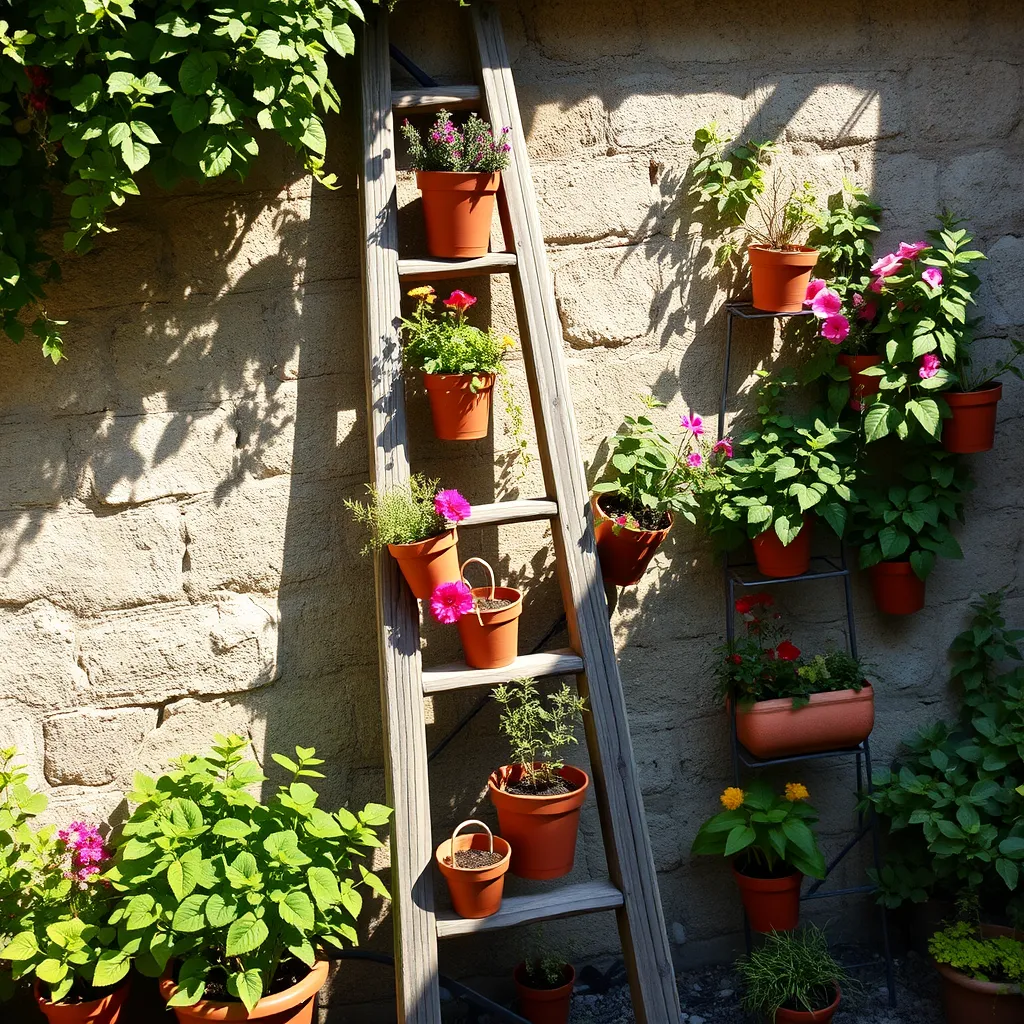
Wooden Ladder Plant Stand

To make a rustic plant stand, find an old wooden ladder. You can often get one from a garage sale or your garage. Clean it well to remove dirt and dust. Choose a spot in your garden that gets good light.
Next, paint or stain the ladder to match your garden style. I like using white or soft pastels for a cottage vibe. Place the ladder against a wall or fence at a slight angle.
Now, add your favorite plants on the steps. Use pots of different sizes for a fun look. You can even hang small pots from the rungs. This adds charm and saves space.
Upcycled Window Frame Trellis

To make a charming trellis, start with a vintage window frame. You might find one at a flea market or thrift shop. Clean it up and remove any old paint.
Next, decide where you want to place the trellis. Find a sunny spot for climbing plants like peas or beans. Then, secure the frame upright in the ground using stakes or bricks.
Now, plant your climbing plants at the base. As they grow, they will climb up the frame. This adds height and beauty to your garden. Plus, it’s a great way to reuse old items.
Painted Stone Garden Markers

To create decorative plant markers, gather some smooth stones from your yard or a nearby river. Make sure they are clean and dry.
Choose your favorite paint colors. I like bright colors that stand out. Use a small brush to write the names of your plants. You can also draw fun designs or symbols.
Once the paint dries, place the stones in your garden next to each plant. These markers not only help you know what you planted, but they also add color to your space. Plus, they are easy to make and fun to personalize!
Mason Jar Lanterns

To make mason jar lanterns, gather a few simple supplies. You need mason jars, tea lights, wire, and twine. Start by cleaning the jars. Next, take the wire and cut a long piece. Wrap it around the neck of the jar, creating a handle. Then, place a tea light inside. You can use real candles, but battery-operated ones are safer. Hang them from trees or set them on tables. The soft light creates a magical glow.
You can also decorate the jars. Use paint or twine to add charm. Try adding flowers or leaves inside for a lovely touch. The options are endless!
Flower-filled Tea Cups

Using vintage tea cups as planters is a fun way to recycle. First, choose cups with no cracks. Next, fill them with potting soil. Make a small hole in the bottom for drainage. Then, add your favorite small flowers. Herbs work great too!
Place these tea cup planters on your porch or windowsill. They bring joy and color to any space. You can mix and match colors and designs for more fun. This project is easy and adds a personal touch to your garden.
Barrel Planters

Old wooden barrels make fantastic planters. Start by finding a barrel. Cut it in half if it’s too big. Next, drill holes in the bottom for drainage. Fill it with soil and choose your plants. Flowers like petunias or geraniums look stunning in barrels.
Place the barrel planters near pathways or at entryways. They give a rustic feel to your garden. You can paint or stain the barrels to match your style. This project is simple but adds a lot of charm to your outdoor space.
Birdhouse Crafting

Building a classic birdhouse is easy and fun. Start by gathering wood. You need a few pieces of untreated wood. Pine works well because it is light and easy to cut. You also need nails, wood glue, and paint if you want to decorate it.
– Cut the wood: Cut one piece for the base, four pieces for the walls, and one for the roof. Make sure the base is about 6 inches square. Each wall should be 6 inches tall.
– Assemble the walls: Use wood glue to attach the walls to the base. Nail them for extra support. Ensure the walls fit snugly together.
– Add the roof: Attach the roof at a slant. This helps rain run off. Use glue and nails for a strong hold.
– Make a hole: Cut a hole in the front wall. It should be about 1.5 inches wide. This hole is for birds to enter.
– Decorate: If you want, paint your birdhouse. Use bright colors or patterns. This adds charm and makes it stand out.
– Hang it up: Find a good spot in your garden. Make sure it is safe from pets and wind. Enjoy watching the birds come to visit.
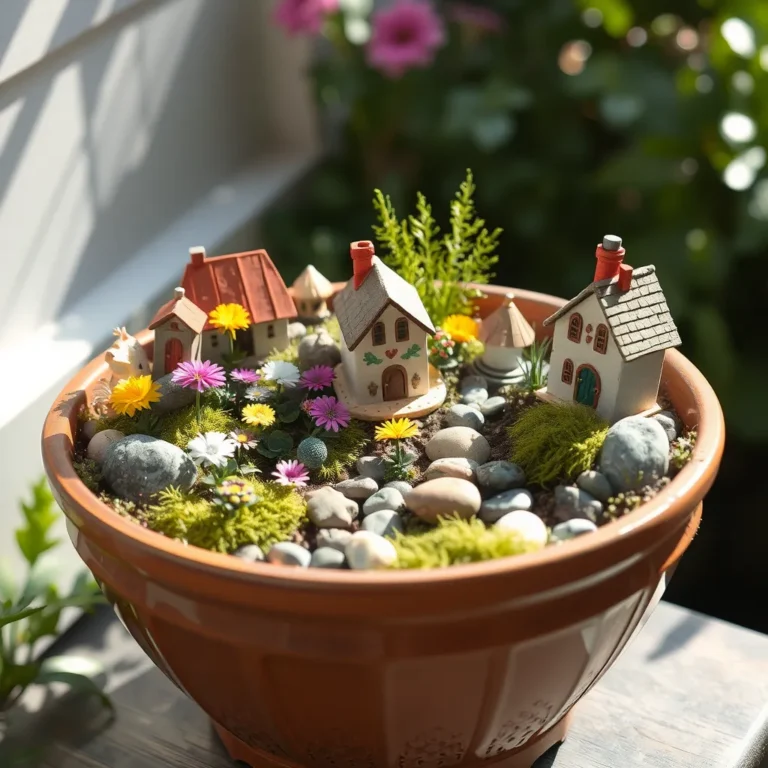
Fairy Garden Creations

Designing a fairy garden is a delightful way to add magic to your yard. It lets your creativity shine. Start by choosing a small container. A shallow pot or a wooden box works best.
– Select a base: Fill the container with soil. Leave some space at the top for decorations.
– Choose plants: Pick small plants like moss, succulents, or tiny flowers. These add life to your garden. Arrange them to create paths and hideaways.
– Add decorations: Use small items like stones, sticks, and shells. You can also buy tiny fairy houses and figures. Place them around the plants for a whimsical look.
– Create pathways: Use small pebbles or wood chips to make paths. This gives your garden structure and makes it fun to explore.
– Personalize it: Add personal touches, like a mini bench or birdbath. Let your imagination run wild!
– Maintain it: Check your fairy garden often. Water the plants and clean up debris. This keeps it looking fresh and lovely.
Both of these projects bring joy to your garden. They invite nature in and add beauty to your space.
Conclusion
You learned how to create a wooden ladder plant stand and upcycle a window frame into a trellis. We explored painting stones to mark your plants and making lanterns from mason jars. You can also turn vintage tea cups into cute planters and use old barrels for rustic planters. Plus, I shared tips for building a birdhouse and crafting a fairy garden. These projects let you use what you have, save money, and add charm to your garden. Get started and enjoy your time creating!