10 Budget-Friendly DIY Walkway Ideas to Transform Your Garden
Are you ready to give your garden a stunning makeover without breaking the bank? In this post, I’ll share 10 budget-friendly DIY walkway ideas that are easy to create and sure to impress. Whether you’re dreaming of a rustic stone path or a vibrant mosaic design, I’ve got detailed steps and cost tips to help you succeed. Let’s transform your garden into a beautiful oasis, one step at a time!
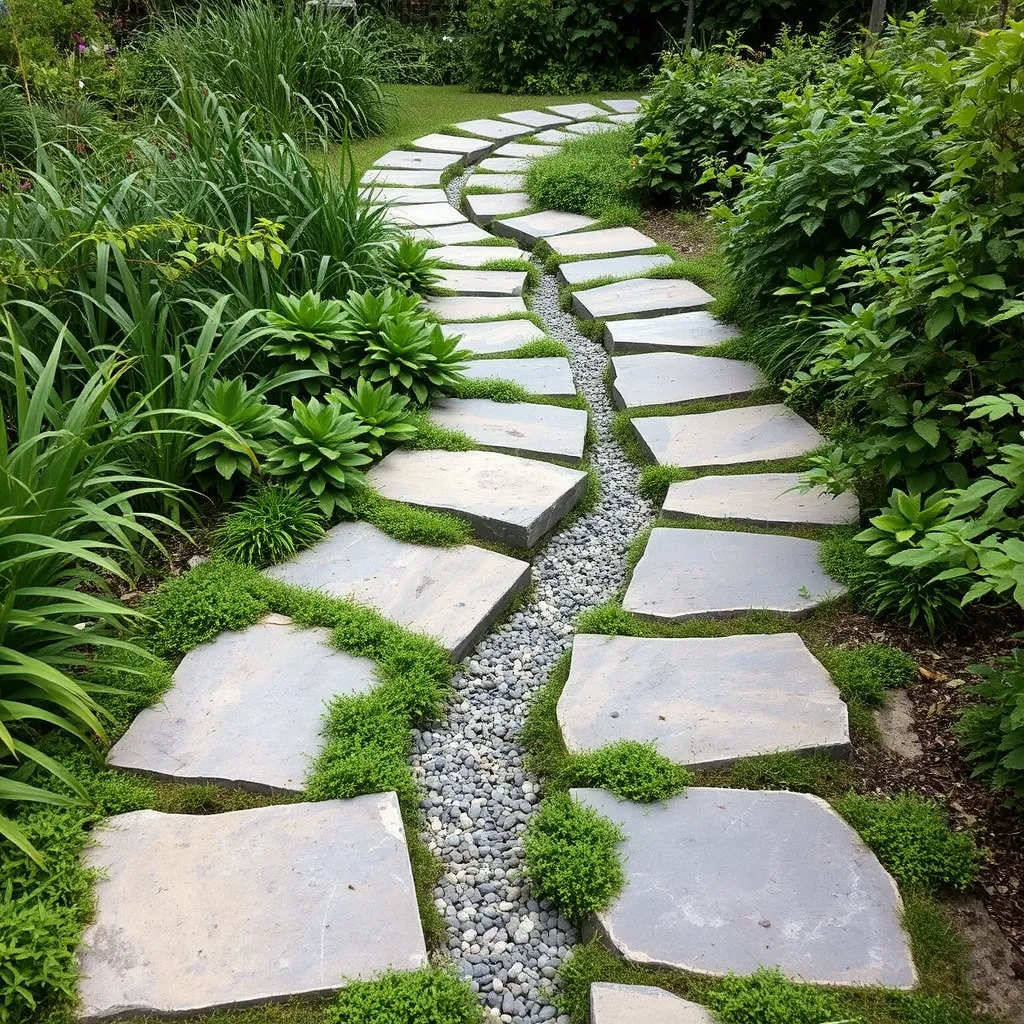
Natural Stone Pathway: Using reclaimed stones for a rustic look

Materials needed:
– Reclaimed stones
– Gravel
To create a natural stone pathway, start by gathering your reclaimed stones. Look for stones from old buildings, paths, or even your yard. Next, choose the path layout. You can create a straight line or a winding path.
1. Layout:
– Place the stones on the ground, marking where they will go.
– Leave space between each stone for gravel.
2. Digging:
– Remove grass and soil in the marked area.
– Make the ground level and flat for the stones.
3. Gravel base:
– Pour gravel into the dug-out space.
– Spread the gravel evenly to create a stable base.
4. Placement:
– Carefully place the reclaimed stones into the gravel.
– Adjust the stones to fit snugly and level.
5. Finishing touch:
– Add more gravel around the stones for extra support.
– Tap the stones down to ensure they stay in place.
The estimated cost for this project is low. You may only need to buy gravel. The rustic look adds charm and warmth to your garden. Plus, it’s eco-friendly by using reclaimed materials. A natural stone pathway enhances your garden’s beauty and invites visitors to explore.
Wooden Plank Walkway: Creating a simple and eco-friendly wood path

To make a wooden plank walkway, you need a few basic items. Gather wooden planks, wood screws, and wood sealant. Look for untreated wood. It’s cheaper and better for the environment.
Start by measuring the area. Mark where the walkway will go. Cut your wooden planks to your desired length. Make sure they fit the space well. Use screws to secure the planks together. This makes the path strong and stable.
When you finish building your walkway, apply wood sealant. This protects the wood from rain and sun. It also helps the wood last longer.
Costs vary, but this project is budget-friendly. You can often find used wood at a lower price. Check local stores or online marketplaces.
For maintenance, inspect the walkway each year. Look for signs of wear. Reapply sealant when needed. This keeps your path looking fresh and new.
Gravel Walkway: Low-cost option for versatile garden designs

For a gravel walkway, you’ll need three main items: gravel, landscape fabric, and edging.
1. Materials needed:
– Gravel
– Landscape fabric
– Edging (wood or metal)
To start, choose a flat area for your path. Mark the edges using stakes and string. Next, dig about 4 inches deep along the marked area. Lay down the landscape fabric. This fabric stops weeds from growing and keeps the gravel in place.
Now, fill the area with gravel. Use a rake to spread it evenly. A depth of about 2 to 3 inches works well. Make sure to leave space for your edging. Finally, install the edging to keep the gravel contained.
Cost-saving tips:
– Buy gravel in bulk for a lower price.
– Use recycled materials for edging.
– Look for free landscaping fabric at local stores or online.
Try different designs with your gravel. You can create curves or patterns. You can also mix colors of gravel to add interest. This simple walkway can change your whole garden look without much cost.
Brick Paver Path: Adding classic charm with easy DIY installation

To create a brick paver path, you need a few simple materials. Gather brick pavers, sand, and edging. You can find these items at your local hardware store.
Step-by-step process:
1. Plan your path. Decide where you want the walkway.
2. Mark the area. Use stakes and string to outline the path.
3. Excavate the soil. Dig about 4 inches deep in the marked area.
4. Add a sand base. Fill the area with 2 inches of sand. Level it out.
5. Lay the brick pavers. Start at one end, placing them close together.
6. Fill gaps with sand. Pour sand over the pavers and sweep it into the cracks.
7. Install edging. Place edging along the sides to keep bricks in place.
Estimated costs:
Brick pavers cost about $3 to $5 per square foot. Sand and edging can cost around $1 to $2. Overall, you might spend $100 to $300, depending on the size.
Long-term durability benefits:
Brick pavers last for decades with little upkeep. They resist wear from weather and foot traffic. Plus, they add value to your garden with their classic look.
Recycled Cement Blocks: A modern twist on traditional pathways

To make a walkway with recycled cement blocks, you need some basic materials. Gather used cement blocks and some grass or ground cover plants. This project is simple, fun, and cheap.
First, decide where you want your walkway to go. Lay out the cement blocks in a straight line or a curvy shape. Make sure to leave space between the blocks. This will allow you to plant grass or ground cover. Once you have your design, set the blocks in the ground. Use a level to keep them flat and even.
Next, fill the gaps between the blocks with soil. Plant your grass or ground cover in these spaces. This will help the walkway blend into your garden. It also gives a nice green look.
Cost-wise, recycled cement blocks are often free or very low cost. You can find them at construction sites or in your neighborhood. If you want to create unique designs, paint the blocks or use different kinds of plants. This can add a personal touch.
Mulch Pathway: An inexpensive natural option for garden paths

For a mulch pathway, you need just a few materials. Gather organic mulch and landscape fabric. The mulch can be wood chips, bark, or shredded leaves. This path is easy to make and very affordable.
To install your mulch path, start by marking the path’s shape. Use a garden hose or rope to outline it. Next, lay the landscape fabric in the marked area. This fabric helps stop weeds. After that, pour the mulch on top. Aim for a depth of about three inches. Make sure to spread it evenly for a nice look.
Maintaining a mulch path is simple. Just add more mulch when it starts to thin out. You might need to rake it every now and then to keep it neat.
When budgeting, you can often find mulch for free or at a low cost. Check local tree services or garden centers. Using mulch also boosts your garden’s health. It helps retain moisture and improve soil quality. This option is not just budget-friendly; it’s eco-friendly too!
Stepping Stones: Custom DIY stones to personalize your garden

Materials needed:
– Concrete mix
– Molds
– Decorative elements
To make your own stepping stones, start by gathering your materials. You can find molds at craft stores or use old baking pans.
1. Prepare the Mix: First, mix the concrete. Follow the instructions on the bag. Aim for a thick, smooth consistency.
2. Add Decorations: While the mix is wet, add decorative elements. You can use colorful stones, shells, or even glass beads. This adds a personal touch.
3. Fill the Molds: Pour the concrete mix into the molds. Tap the sides to remove air bubbles.
4. Cure the Stones: Let the stones sit for 24 to 48 hours. Once they are hard, pop them out of the molds.
Estimated costs: You can make several stones for about $20 to $30. The cost varies based on your decorative choices.
Decorative ideas: Try different shapes and colors. You can also paint the stones or write names and quotes on them. This makes your garden feel unique and special.
Pebble Walkway: Using pebbles for a clean and modern look

To create a pebble walkway, you need a few simple materials:
– Pebbles
– Sand
– Landscape fabric
First, choose the area for your walkway. Mark the path with stakes and string. Dig about 3 inches deep along the path. This depth allows for a solid base. Next, lay down the landscape fabric. This step helps keep weeds out while allowing water to flow.
Now, add a layer of sand. Spread it evenly across the fabric. This layer creates a stable base for the pebbles. Once the sand is in place, pour pebbles over it. Spread the pebbles out evenly, filling the path. You can mix different colors for a unique look.
To create borders, use larger stones or wood along the edges. This will keep the pebbles in place and add style.
In terms of cost, pebbles are quite affordable. You can find them at garden centers or online. Expect to spend around $100 for a small path. Design-wise, a pebble walkway adds a modern touch to your garden. It is easy to maintain and looks great year-round.
Wood Chips or Bark Path: An efficient way to create garden access

Materials needed:
– Wood chips or bark
– Landscape fabric
To make a wood chip or bark path, start by choosing the right area. Look for spots where you want to walk. Mark the path shape with stakes and string. Next, lay down landscape fabric. This helps stop weeds from growing through.
Now, spread a thick layer of wood chips or bark over the fabric. Aim for 3 to 4 inches. This depth gives a good surface to walk on. You can mix different types of bark for a unique look.
For low maintenance, this path requires little care. Just check for any weeds or chips that need refreshing. Wood chips last a few years before needing a top-up.
Budget tips:
– Buy in bulk from local suppliers.
– Look for sales or discounts online.
This method is cost-effective. It adds charm to your garden without breaking the bank.
DIY Mosaic Walkway: Artistic touch with colorful tile designs

To create a DIY mosaic walkway, you need a few simple materials. Here’s what you will need:
– Broken tiles
– Cement
– Space for creativity
First, gather your broken tiles. You can use old dishes or buy cheap tiles from a store. Next, decide on your design. You can create patterns or just mix colors for a fun look.
After that, prepare your ground. Clear the area where you want the walkway. Lay down some sand or gravel for a stable base. Then, mix the cement according to the package instructions.
Now it’s time to place your tiles. Spread the cement on the ground. Press the tiles into the cement, leaving space between each one. Keep going until your design is complete.
Let the cement dry according to the instructions. Once it’s set, you can fill the gaps with more cement if needed. This adds strength and keeps the tiles in place.
For cost analysis, broken tiles are often free or very cheap. Cement is also affordable. This means you can make a beautiful walkway without spending much.
For design inspiration, look online or in magazines. You can find many ideas to fit your style. Personalize your walkway with colors and shapes that you love. This project will make your garden stand out and show off your creativity.
Conclusion
You can now create stunning pathways for your garden using various materials. We explored options from natural stone to DIY mosaic walkways. Each type enhances your garden’s charm while fitting different budgets. Remember, each design not only improves beauty but also practicality. Choose what connects with your style and budget. Enjoy personalizing your outdoor space and make it truly yours.